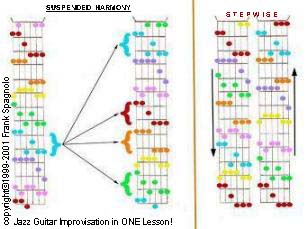
For larger
leaps, proceed from any of 7 colored diagrams in Column I (see
image at RIGHT) to any diagram relative to it's fret board
position in Column II. For example, the arrows indicate 'some' of
the possible optional diagrams that would follow a blue chord.
Then find your newly arrived at colored diagram back in Column I
and continue through any of the options indicated in the same
manner.
Note
that larger jumps are more difficult though not impossible to
maintain melodic integrity through and are therefore recommended
after pauses, beginning a new phrase. The basic system diagrams,
shown at the
far
left of this page indicate the options
from the use of Columns I & II (right) that most readily
maintain melodic integrity by use of shorter jumps across the fret
board as described in previous chapters labeled
"BEGINNING
MUSICIANS" and
"INTERMEDIATE
APPROACH" .
Alternating descending chord change
options from those described by the use of basic Columns (shown
left) with the "Columns I & II" option of a chord
followed by another in the very same fret will produce an example
of line progressions. (an ascending or descending line of notes
within a chord progression).
MOVING
IN THIRDS: Shown at
the right, (below columns I & II) is a two column chart
showing the ascending and descending options from Columns I &
II for intervals that are one step larger than those shown in the
basic diagrams at the left. Many of the options include at least
some smaller intervals that can potentially facilitate melodic
improvisation. Melodic sequences will flow but not as readily as
with the use of options from the diagrams at the left of the page.
Melodic lines do occasionally span MINOR THIRD INTERVALS (moving
three frets, skipping over two).
With
development of dexterity, the Ear begins to participate and the
music begins.
Chromatic
Circle of 5ths & Tri-tone Substitution
Just a
reminder, for use of the system, fluidity with use of the
basic options already described comes first. As for additional
system options on this page, the described use of the diagrams
significantly outweighs the defining of terminologies.
Raising
an assigned chord option by a half step in pitch (occasionally)
and then continuing from that point with basic options carries a
progression down a flat
5th interval
(rather than a 5th) between consecutive roots of chords which
essentially converts your chromatic
circle of 5ths
into a diatonic
circle of 5ths.
If this option is used within phrases, it works better as a
substitute for a descending (in pitch) option; this would create
smaller intervals which are more effective for melody.
Raising
an assigned chord option by a half step in pitch and then
immediately returning to a chord that would have followed the
chord that the raised chord had been substituted for (like a
temporary step outside the tonality) qualifies as a tri-tone
substitution.
The return to the original tonality should create a resolution.
Exiting and returning the tonality via the shorter interval
options is works smoothly. See more about resolution under SUSPENDED
HARMONY
below.
Raising
an assigned chord option by a half step in pitch in a descending
progression, when combined with the use of other short interval
options may be one way to enhance line-progressions, utilizing the
melodic character of short intervals between high notes.
Similarly,
the abundance of different notes and the frequent key changes that
occur in this system's style, dictate that harmonic analysis of
any given chord structure can vary depending on what note is being
heard as the root at a given time. For this reason, a similar
logic to that which allows tri-tone substitution also supports the
validity of altering an assigned chord by lowering
it a half step. As an apparent step outside the tonality,
temporary or otherwise, these options work fine and again, are
affected smoothly if the shorter interval options are chosen.
ACCESS
SYSTEM DIAGRAMS in a "Sized for Printing" version that
also be Viewed Off-Line
CLICK TO
CHART INDEX
ALTERED
DIAGRAMS
SUSPENDED
HARMONY: Shown
below is another group of diagrams to which the same logic may be
applied as the diagrams in the main section of this lesson.
These
SUSPENDED harmony diagrams are based on a six note scale with a
characteristic omitted
3rd;
rather than 7 notes they create a sound with more resolution
or restfulness. Thinking of them as a restful as a resolution is
all that's needs to be a concern.
They are
not as easy to fret as the MAJOR diagrams so they're used in a
different way.
Fretting
any 4 or 5 notes with your left hand rather than all six may be
one solution but fretting all six is recommended for the sake of
simplicity. With some effort, it gets easier pretty quickly. To
fret all six notes, here is the recommended fingering for ALL
diagrams, (MAJOR AND SUSPENDED)
RECOMMENDED
FINGERING:
"Always
use your pinky to hold down two (and only 2) of the highest
pitched strings & always use your index finger to fret the
lowest notes. . . except for while using the INDIGO (darker
bluish) colored diagram who's two highest notes are not in the
same fret."
This
fingering is recommended so your other fingers will be in position
to alternate between the major and suspended more readily.
The
original MAJOR diagrams are easier to fret and better suited for
the "necessary," "fast left hand changes" so
while phrasing around the fret board using MAJOR diagrams insert
or blend options from these SUSPENDED diagrams during pauses.
With the more difficult suspended fingerings, arriving at them
after a brief stop at their corresponding colored major diagram
smoothes things over. By arriving at them from their corresponding
major colored diagram they aren't too much more of a stretch if
you are using the recommended fingering.
These
SUSPENDED harmony diagrams provide momentary resolution for their
respective corresponding colored MAJOR diagrams. Know them 'good'
enough to insert between phrases.
Once
mobility is established through the basic options for the MAJOR
diagrams, try to finish each line with a resolution, that is,
substitute or include a suspended diagram at pauses.
For
the Ambitious Only: Note that, as the arrows below indicate,
it is reasonable to apply the same logic to the
'suspended' harmony diagrams as is described previously for the
'major' diagrams. However because of some difficult fingerings,
attempting to use these diagrams in that way may slow things down
considerably. "Most" of the SUSPENDED diagram
fingerings though,are not actually so difficult. The system
allows enough freedom to avoid the more difficult fingerings and
take advantage of the more finger friendly areas a large part of
the time, The exception would be when reaching either end of the
fret board limits options. Substituting MAJOR options will
suffice. Adjustment in rhythm or emphasis is part of the game. The
ear has the last word.